6.2. pipx-based installation
To help you installing MUSE in your system we will follow these steps:
Launching a terminal: Needed to both install and run MUSE.
Installing a compatible Python version: MUSE works with Python 3.11 to 3.14.
Installing pipx: A Python application manager that facilitates installing, keeping applications updated and run them in their own isolated environments.
In the following sections, we will guide you step by step in configuring your system so it can run MUSE. At the end, we include alternative ways of installing MUSE if this method does not work for any reason and for advanced users.
Note
The next sections will explain in detail the appropriate steps as well as commenting on possible caveats. We strongly encourage you to read through the sections below to understand what these steps entitle, but in the end, what we are going to do to install MUSE is the following:
Open a terminal
Install pyenv (Linux and MacOS) or pyenv-win (Windows) and make sure it works by invoking pyenv –version in the terminal.
Run the following commands in the terminal:
pyenv install 3.11.0
pyenv shell 3.11.0
python -m pip install pipx
python -m pipx ensurepath
python -m pipx install muse-os
After this, MUSE will be available to use system wide simply by invoking muse in the terminal. To illustrate this and to test your installation, run muse –model default. You should then see a a list of outputs printed to the terminal showing the computations going on in the background.
6.2.1. Launching a terminal
All operating systems have a Terminal application that let you run commands. You will need to use it extensively when using MUSE, so we strongly suggest you get familiar with it. For now, let’s just figure out how to launch one:
Linux: Depending on the distribution, you might have a shortcut in your tasks bar already or it should be easily found in the menu. Look for
ConsoleorTerminalto lunch the application.MacOS: Press
Super key + Spaceto open the search box. There, typeTerminaland pressEnter.Windows: Windows comes with a couple of options. We will be using
Windows PowerShell. Press theWindows keyand start typingPowerShell. When the application shows up, click to on it.
Once you have launched the Terminal, the window that opens will show the command prompt, where we will input all the commands form now on. The following are a couple of examples of what it looks like, typically, but it might be a bit different in your system depending on how it is configured:
Linux and MacOS Terminal:
your_user_name@computer_name:~$
Windows PowerShell:
PS C:\Users\your_user_name>
Note
For simplicity, we will be excluding the command prompt in the following sections whenever we indicate that a command should be executed in the terminal.
6.2.2. Installing a compatible Python version
MUSE needs Python to run and it works with versions 3.11 to 3.14, so the next step is to install a suitable version of Python.
Note
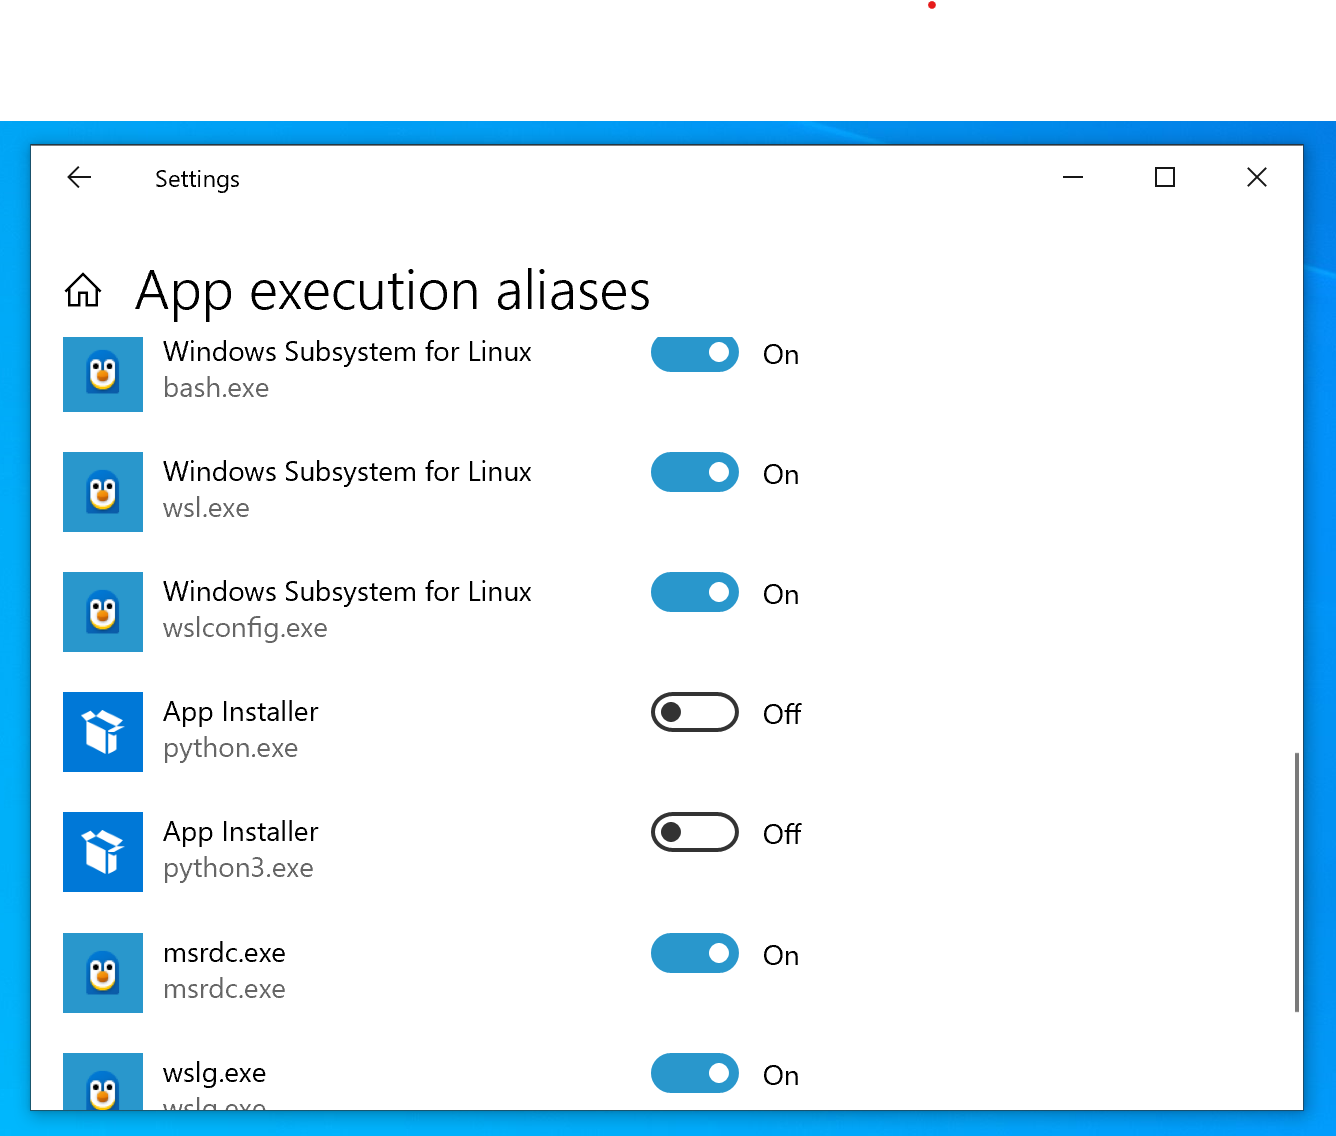
Windows users should disable the alias for Python that comes by default with Windows
and that will try to install Python from the Microsoft Store every time we write
python in the terminal. To do so, press the Windows key and start typing
alias, when it shows up, click in Manage app execution aliases. In the
window that opens, disable all the entries related to Python, like in the image.
Note
If you already have a Python version installed from the Microsoft Store, you might have a py command that will launch Python in the terminal. That Python Launcher will use a Microsoft Stored-installed version of Python. Unless any of those versions, under the control of Microsoft and their autoupdating schedule, happen to be compatible with MUSE, we advise against using the launcher and follow the instructions below, which will give you more control on what is exactly being run and how MUSE is being installed.
The first thing will be to check if you already have a suitable python version installed. Open a terminal and run:
python --version
If the output is Python 3.Y.X, where X is any number and Y is 11, 12, 13 or 14, then you have a version of Python compatible with MUSE and you can skip this section altogether. Move to Installing pipx. In any other case, keep reading.
There are multiple ways of installing Python, as well as multiple distributions. Here we have opted for the one that we believe is simplest, requires the smallest downloads and gives the maximum flexibility: using pyenv.
Note
If you have Anaconda Python installed, then you can use it instead of pyenv to create an environment with a suitable Python version. Go to section Creating a conda virtual environment and jump to Installing pipx when it is completed.
6.2.2.1. Installing pyenv
pyenv (pyenv-win for Windows) is a tool that lets you install and manage different python versions. It is small, unobtrusive and self-contained, and it is available for the three operating systems. However, you might want to consider a more fully fledged Python distribution like Anaconda, specially if your work involved non-python packages or a lot of data science and machine learning tools. If that is the case, go to the Virtual environment-based installation section.
To install pyenv, follow these steps:
Linux: In this case, you will need to clone the GitHub repository using
git. Most Linux distributions come withgitinstalled, so this should work out of the box. Then, complete the setup by addingpyenvto your profile, so the executable can be found. You can check the instructions in the official webpage, or follow the below commands that were tested on Ubuntu 22.04 LTS using its popular bash shell and z-shell. To be specific, we tested them on GNU bash, version 5.1.16(1)-release (x86_64-pc-linux-gnu) and zsh 5.8.1 (x86_64-ubuntu-linux-gnu).Now, we go through the installation procedure of
pyenvon Linux, step-by-step:# Step 1: Install essential libraries needed for pyenv sudo apt install -y make build-essential libssl-dev zlib1g-dev \ libbz2-dev libreadline-dev libsqlite3-dev wget curl llvm libncurses5-dev \ libncursesw5-dev xz-utils tk-dev libffi-dev liblzma-dev python3-openssl \ git # Step 2: Clone the `pyenv` repository for Linux git clone https://github.com/pyenv/pyenv.git ~/.pyenv # Step 3: Run one code block in this step only, depending on what shell you use: # If you are on the bash shell run the following: echo 'export PYENV_ROOT="$HOME/.pyenv"' >> ~/.bashrc echo 'export PATH="$PYENV_ROOT/bin:$PATH"' >> ~/.bashrc echo 'eval "$(pyenv init --path)"' >> ~/.bashrc source ~/.bashrc # If you are on the z-shell, run the following: echo 'export PYENV_ROOT="$HOME/.pyenv"' >> ~/.zshrc echo 'export PATH="$PYENV_ROOT/bin:$PATH"' >> ~/.zshrc echo 'eval "$(pyenv init --path)"' >> ~/.zshrc source ~/.zshrc # Step 4: Confirm successful installation of `pyenv` upon invoking the following command in the terminal. You should be returned something similar to `pyenv 2.4.1-10-g2e0bb023` pyenv --version
MacOS: The simplest option is to use Homebrew:
brew update
brew install pyenv
Then, complete the setup by adding
pyenvto your profile, so the executable can be found. Check the instructions in the official webpage.Windows:
pyenv-winis a separate project but it has the same functionality and it is also simpler to setup. You can read the detailed installation instructions from the official pyenv-win website, but the easiest way is to run the following command in thepowershelland, upon closing and launching a new shell, you should be ready to go:# Step 1: In your powershell, invoke the following command: Invoke-WebRequest -UseBasicParsing -Uri "https://raw.githubusercontent.com/pyenv-win/pyenv-win/master/pyenv-win/install-pyenv-win.ps1" -OutFile "./install-pyenv-win.ps1"; &"./install-pyenv-win.ps1" # Step 2: close the shell you invoked in the command from Step 1 and re-launch powershell # Step 3: Confirm success; you should be returned something similar to `pyenv 3.1.1` pyenv --version
Note
If you are getting any
UnauthorizedAccesserror, then start Windows PowerShell with the “Run as administrator” option (see figure above) and run:Set-ExecutionPolicy -ExecutionPolicy RemoteSigned -Scope LocalMachine
Finally open a normal PowerShell and re-run the above installation command.
6.2.2.2. Installing your chosen Python version
With pyenv installed and correctly configured, it is now easy to install any Python version we want. To see the versions available run:
pyenv install -l
You should see a long list of versions to choose from. Let’s install 3.11.0 as an example:
pyenv install 3.11.0
The command will take a minute or two to complete, depending on your internet connection, and show an output similar to the following (this is an example from Windows):
:: [Info] ::  Mirror: https://www.python.org/ftp/python
:: [Downloading] ::  3.11.0 ...
:: [Downloading] ::  From https://www.python.org/ftp/python/3.11.0/python-3.11.0-amd64.exe
:: [Downloading] ::  To C:\Users\your_username\.pyenv\pyenv-win\install_cache\python-3.11.0-amd64.exe
:: [Installing] ::  3.11.0 ...
:: [Info] :: completed! 3.11.0
Now, we have a new Python version in our system, but it is still not available (if you run python --version you will get the same result as before). There are two options moving forward:
If you want to set it as the global python version, available system wide (only do this if you really want to set is as your main Python!) run:
pyenv global 3.11.0
If you just want it momentarily to install MUSE run instead the following command:
pyenv shell 3.11.0
In both cases, if you run python --version afterwards, you should get Python 3.11.0.
6.2.3. Installing pipx
Next we need to install pipx, a Python application manager that facilitates installing, keeping applications updated and running them in their own isolated environments.
More specifically, pipx will create a virtual environment to run the tools it installs based on the python version that was used to install pipx to start with, unless you specify another version and that other version is system wide available.
We could skip this step and install MUSE directly, but that will risk to have conflicting dependencies in the future if you install any other application, breaking your MUSE installation, and we do not want that to happen.
The installation instructions for pipx can be found in the official webpage specific for the three operating systems. The following instructions, however, should work for the three cases:
python -m pip install pipx
python -m pipx ensurepath
Make sure you run these commands with a compatible Python version, as described in the previous section. If for whatever reason, this does not work, follow the system specific instructions in the webpage.
6.2.4. Installing MUSE itself
With all the system prepared, installing MUSE is the easiest part:
python -m pipx install muse-os
As above, make sure you run this command with the appropriate Python version.
And that is all! Now, MUSE should be available system wide simply by running muse in the terminal. For example, open a new terminal and run:
muse --model default
This will run a default, example model, completing after reaching year 2050. The following are the last few lines of the simulation:
...
-- 2023-08-02 09:11:50 - muse.sectors.sector - INFO
Running gas for year 2050

-- 2023-08-02 09:11:50 - muse.interactions - INFO
Net new_to_retro of 1 interactions interacting via transfer

-- 2023-08-02 09:11:50 - muse.hooks - INFO
Computing initial_asset_transform: default

-- 2023-08-02 09:11:50 - muse.hooks - INFO
Computing initial_asset_transform: clean

-- 2023-08-02 09:11:50 - muse.demand_share - INFO
Computing demand_share: default

-- 2023-08-02 09:11:51 - muse.production - INFO
Computing production: max

-- 2023-08-02 09:11:51 - muse.production - INFO
Computing production: max

-- 2023-08-02 09:11:51 - muse.production - INFO
Computing production: share

-- 2023-08-02 09:11:51 - muse.mca - INFO
Finish simulation year 2050!